|
|
本实验是对OSPF协议的基本配置,涉及到配置OSPF协议所必须的命令和常用的show命令。
1.实验目的
通过本实验,读者可以掌握以下技能:
●在路由器上启动OSPF协议;
●声明相应网络进入OSPF路由进程;
●查看OSPF路由信息;
●查看OSPF协议配置信息;
●查看OSPF邻居路由器信息。
2.设备需求
本实验需要以下设备:
●Cisco路由器3台,分别命名为R1。R2和R3,其中R2要求具有2个串行接口,R1和R3均要求具有1个串行接口和1个以太网接口;
●2条DCE电缆和2条DTE电缆 (或2条DCE转DTE电缆);
●1台终端服务器,如Cisco 2509路由器,及用于反向Telnet的相应电缆;
●4台带有超级终端程序的PC机,以及Console电缆及转接器。
3.拓扑结构及配置说明
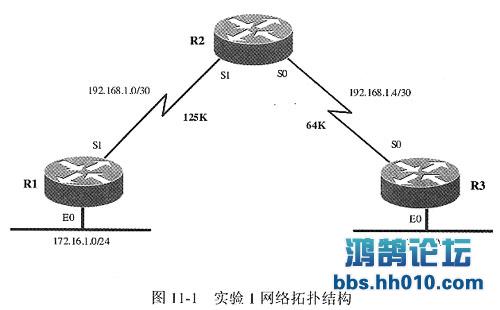
本实验的拓扑结构如图11-1所示,利用DCE和DTE电缆把R1。R2和R3路由器连接起来。各路由器使用的接口及其编号如图11-1中的标注。

各接口IP地址分配如下:
R1:S1 192.168.1.130,E0 172.16.1.1/24
R2:S0 192.168.1.5/30,S1 192.168.1.2/30
R3:S0 192.168.1.6/30,E0 172.16.3.1/24
实验中R1、R2之间串行线路速率设置为 125kbit/s;R2、R3之间串行线路速率设置为64kbit/s。
本实验要求通过对OSPF路由选择协议的配置,实现拓扑中全网的连通性。
4.实验配置及监测结果
按照拓扑结构图连接好所有设备后,给设备加电,开始进行实验。
第1部分:配置接口和OSPF
首先对各路由器的接口和OSPF协议进行配置。配置清单11-1记录了对3台路由器的配置。
配置清单11-1 OSPF协议的基本配置
第1段:配置R1路由器
Router>en
Router#conf t
Enter configuration commands, one per line. End with CNTL/Z.
Router(config)#no logg console
Router(config)#hostn R1
R1(config)#int e0
R1(config-if)#no keepa
R1(config-if)#ip addr 172.16.1.1255.255.255.0
R1(config-if)#no sh
R1(config-if)#
R1(config-if)#int s1
R1(config-if)#ip addr 192.168.1.1255.255.255.252
R1(config-if)#clock rate 125000
R1(config-if)#no shut
R1(config-if)#exit
R1(config)#router ospf 100
R1(config-router)#network 192.168.1.1 0.0.0.0 area 0
R1(config-router)#network 172.16.1.1 0.0.0.0 area 0
R1(config-router)#^Z
R1#
第2段:配置R2路由器
Term_Server#2
[Resuming connection 2 to r2 ... ]
Router>en
Router#conf t
Enter configuration commands, one per line. End with CNTL/Z.
Router(config)#no logg console
Router(config)#shostn R2
R2(config)#int s0
R2(config-if)#ip addr 192.168.1.5 255.255.255.252
R2(config-if)#no sh
R2(config-if)#int s1
R2(config-if)#ip addr 192.168.1.2 255.255.255.252
R2(config-if)#no sh
R2(config-if)#exit
R2(config)#router ospf 100
R2(config-router)#netw 192.168.1.2 0.0.0.0 area 0
R2(config-router)#netw 192.168.1.5 0.0.0.0 area 0
R2(config-router)#^Z
R2#
第3段:配置R3路由器
Term_Server#3
[Resuming connection 3 to r3 ... ]
Router>en
Router#conf t
Enter configuration commands, one per line. End with CNTL/Z.
Router(config)#no logg console
Router(config)#shostn R3
R3(config)#int s0
R3(config-if)#ip addr 192.168.1.6 255.255.255.252
R3(config-if)#clock rate 64000
R3(config-if)#no shut
R3(config)#int e0
R3(config-if)#no keepa
R3(config-if)#ip addr 172.16.3.1255.255.255.0
R3(config-if)#no sh
R3(config-if)#exit
R3(config)#router ospf 100
R3(config-router)#netw 192.168.1.6 0.0.0.0 area 0
R3(config-router)#netw 172.16.3.1 0.0.0.0 area 0
R3 (config-router)#exit
R3(config-if)#^Z
R3#
(1)在上述配置中,首先对每台路由器的接口进行了配置。需要注意以下两点:
在配置串行接口时,应按照接口所连接的电缆类型,对连接DCE电缆的接口配置时钟;
在配置以太网接口时,使用了no keepalive命令,以便在不连接网线的情况下,使接口处于激活状态。
(2)router ospf 100命令启动一个OSPF路由选择协议进程(Process),其中的"100"为进程号。与配置IGRP和EIGRP协议中的AS号不同的是,在配置OSPF时,并不需要每台路由器中的进程号一致。AS和进程是完全不同的两个概念。
(3)network命令使相应酌网段加入OSPF路由进程中,其格式为:
network网络地址(或IP地址)通配码area区域号
在本实验的配置中,使用了相应接口IP地址,并且把通配码写成"0.0.0.0",区域号为0,即主干区域。
在OSPF的配置中,只要把接口加入到OSPF进程中,此接口所对应的网段就加入到OSPF路由进程中了。
(4)对于另外2台路由器重复类似的配置,完成OSPF协议的基本配置。
第2部分:查看IP路由表和测试连通性
下面对配置后的各路由器进行查看和测试,看是否实现了全网的连通。
在这一部分,我们使用了show ip route、ping、trace等命令。
监测清单11-1记录了所有的操作及其结果。
监测清单11-1查看IP路由表并测试连通性
R3#sh ip route
Codes: C - connected, S - static, I - IGRP, R - RIP, M - mobile, B - BGP
D - EIGRP, EX - EIGRP external, 0 - OSPF, IA - OSPF inter area
N1 - OSPF NSSA external type 1, N2 - OSPF NSSA external type 2
E1 - OSPF external type 1, E2 - OSPF external type 2, E - EGP
i - IS-IS, L1 - IS-IS level-1, L2 - IS-IS level-2, ia - IS-IS inter area
* - candidate default, U - per-user static route, o - ODR
P - periodic downloaded static route
Gateway of last resort is not set
172.16.0.0/24 is subnetted, 2 subnets
O 172.16.1.0[110/138]via 192.168.1.5,00:00:21,Serial0
C 172.16.3.0 is directly connected, Ethernet0
192.168.1.0/30 is subnetted, 2 subnets
O 192.168.1.0[110/128]via 192.168.1.5,00:00:21,Serial0
C 192.168.1.4 is directly connected, Serial0
R3#
Term_Server#2
[Resuming connection 2 to r2 ... ]
R2#sh ip route
Codes: C - connected, S - static, I - IGRP, R - RIP, M - mobile, B - BGP
D - EIGRP, EX - EIGRP external, 0 - OSPF, IA - OSPF inter area
N1 - OSPF NSSA external type 1, N2 - OSPF NSSA external type 2
E1 - OSPF external type 1, E2 - OSPF external type 2, E - EGP
i - IS-IS, L1 - IS-IS level-1, L2 - IS-IS level-2, ia - IS-IS inter area
* - candidate default, U - per-user static route, o - ODR
P - periodic downloaded static route
Gateway of last resort is not set
172.16.0.0/24 is subnetted, 2 subnets
O 172.16.1.0 [110/74] via 192.168.1.1,00:00:43,Serial1
O 172.16.3.0 [110/74] via 192.168.1.6,00:00:43,Serial0
192.168.1.0/30 is subnetted, 2 subnets
C 192.168.1.0 is directly connected, Serial1
C 192.168.1.4 is directly connected, Serial0
R2#ping 172.16.1.1
Type escape sequence to abort.
Sending 5, 100-byte ICMP Echos to 172.16.1.1, timeout is 2 seconds:
!!!!!
Success rate is 100 percent (5/5), round-tdp min/avg/max =16/18/20 ms
R2#ping 172.163.1
Type escape sequence to abort.
Sending 5, 100-byte ICMP Echos to 172.16.3.1, timeout is 2 seconds:
!!!!!
Success rate is 100 percent(5/5),round-trip min/avg/max=28/31/32 ms
R2# |
|